And I know it works because, well.. you know, people have being doing it here for hundreds and hundreds of years.
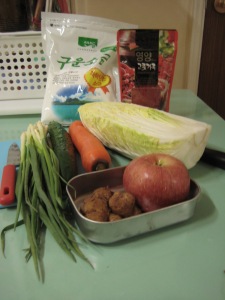
[caption id="attachment_467" align="alignleft" width="225" caption="the ingredients"]
 [/caption]
THE MAKING OF KIMCHI:
First, you have to get all your ingredients together.
- Napa Cabbage (Napa is best, but any kind will work, I think)
- green onions or scallions
- peeled garlic cloves
- raw ginger
- other vegetables: daikon radish is traditional, I hear greens are real good, I like carrots and cucumber and I think broccoli would be good and maybe beets
- a small apple
- sea salt (iodide in salt can make your ferments turn BLACK, plus sea salt is better for you and it tastes better and sticks better to your food)
- Korean red pepper flakes or some sort of alternative like Thai chile paste
- fish sauce, anchovy sauce or soy sauce, although I used Yoshida's BBQ sauce (which is not actually BBQ sauce) because it was what we had on hand
- 1-2 t. honey
This won't make you the most traditional kimchi in the world, but it will make you good kimchi (or so I hear), and I believe it. The ingredients look right and all of them were found in or around the Kimchi-making section of the grocery store.
I didn't do a lot of measuring, I just kind of made it up (another reason it might be too salty...), like I, y'know.. do, and so you may want to actually measure things. If you do, Kimchi recipes abound online, or I will actually measure what I put in the next time (once I know if this time is a flop) and post that here.
Also, you can make White Kimchi, which leaves the red pepper out.
Since coming here, I've grown quite a fan of the red pepper in things (in a moderate sense.. a moderate sense which is never really applied to Korean cuisine, so I'm not sure how this happened), so I put it in, but it can be a little spicy, so keep that in mind.
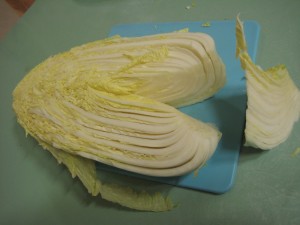
First, you want to take the top leaves off your cabbage. I got only half of one at the grocery store for two reason: 1.) I was unsure as to my skill in fermentation and, 2.) it was cheaper. So, I took off the toppest two leaves anyway, because you need them for later. Wash them and set them aside.
Now, chop your cabbage up.
[caption id="attachment_468" align="alignright" width="300" caption="my cabbage half"]
 [/caption]
Or.. that is, first cut out the big stem thing, and cut out more than I did, because I ended up having to pick out big chunks of thick stem later on. The thick bits are favorited by some people, but not by me. I like the curly, tender bits.
[caption id="attachment_469" align="alignleft" width="300" caption="chopped and rinsed"]
 [/caption]
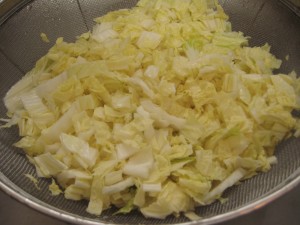
Now, you want to chop it to bits. Traditionally, it's not chopped nearly as fine as I did. Maybe... in 3"x3" pieces, but I want to be able to use it more as a relish on meats and things, plus.. I like my Kimchi a whole lot more when I don't have to shove a HUGE piece in my mouth all at once. The beauty of Kimchi is the absolutely overwhelming flavor and who can focus on the overwhelming flavor when they're simply focusing on the fire that has been ignited in their mouth by thousand bits of red pepper on a giant leaf of cabbage?
Tiny bits are nicer.
Then, you want to rinse them and salt them. Some recipes will say to soak the leaves in salt water, but I liked this approach better.
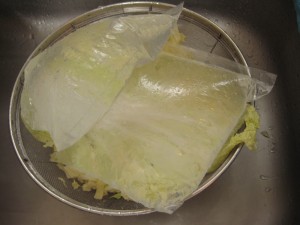
Put the rinsed bits into a colander (or a sieve like I have there), salting them as you go, and then..
[caption id="attachment_475" align="alignright" width="300" caption="water weights"]
 [/caption]
weight them down with ziplocs full of water.
What would have been ideal is to have had a gallon ziploc on hand, but I didn't, so these two quart sizes worked.
I laid my outer cabbage leaves, the whole ones, on top of my chopped cabbage leaves and salted them, too, before adding the weight. Then, in the interest of curiosity, put the sieve over a bowl so you can see how much water comes out of the leaves.
Leave them to drain for two hours.
In the meantime, though, you can..
[caption id="attachment_476" align="alignleft" width="300" caption="green onions and carrots"]
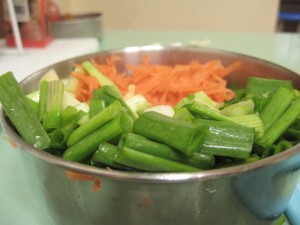 [/caption]
Chop your onions and grate/chop your carrots. I chose grating. It was easy. Plus, that tiny bit at the end that will murder your fingers if you keep trying to grate it: you get to eat it. And carrots here taste a little bit like sweet chunks of candy, so I ate it.
Also, use less than half of what I did here. Not a whole, giant carrot, and not a whole bunch of green onions.
After that, you can peel and chop your ginger, garlic and your apple.
[caption id="attachment_477" align="alignright" width="300" caption="everybody peeled and ready to chop"]
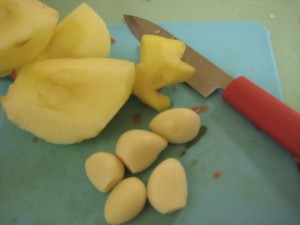 [/caption]
You will, again, want to use less than half of what I did here. Half an apple, two garlic cloves and a one inch finger of ginger.
Eat the other half of your apple. If it's like mine, it is delicious and, like the carrot, a little bit like candy.
Then chop them up, but you don't have to go really fine, because next you stick all three of them in the blender and whiz them until they're all pulpy.
The apple is in place of white sugar and gives the excited stuff something to eat while it's getting all fizzy.
[caption id="attachment_479" align="alignleft" width="225" caption="cucumber, green onions, carrots and apple-ginger-garlic pulp"]
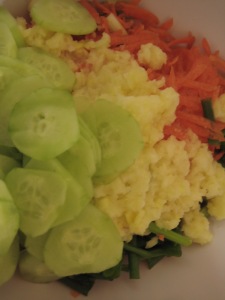 [/caption]
That scrambled egg stuff is what it'll look like.
Scrambled eggs, I guess, basically.
Don't taste it, though. It won't taste like scrambled eggs.
Don't forget to chop up all your other vegetables, too. I almost forgot my cucumber and threw it in last.
Mix all the vegetables but the cabbage up and put them to drain, too, while the cabbage finishes. They won't drain much, but unless you want your Kimchi to be swimming in red water, some drainage will be nice.
Once the cabbage is drained, you want to rinse it. Really, really well. Better than I rinsed mine. Good enough to get off a lot of salt since there's probably a lot on there and, as I said before, sea salt sticks real well to everything including your friends and relations.
And your cabbage.
Then mix all your drained vegetables together in a big bowl with (approximated from what I used.. which is to say.. somewhat less of each than I used):
1/4 c. red pepper (I actually did use this much and while you should definitely use less if you don't like spice, this is probably pretty accurate as far as tradition)
1/8 c. sauce (fish, anchovy or soy)
1-2 t. honey (more for the happies to feed on)
And don't use your hands because red pepper is hot and your hands get into your eyes and nose and unless you wash them really well that can HURT.
Not that I'm saying you don't wash your hands well, just... you know. In case you didn't. For some reason.
Also, the red pepper can stain your hands, or so I hear.
After all the mixing, you can transfer your glop into a clean, glass jar (plastic is pretty likely to leach, especially with the high acid content you'll have going). You will want to make sure, if you either making more than me or using a smaller jar than me, that you leave some head room. I just had a really big jar, so I didn't need to worry about head room, but I'd leave about 1 inch, maybe?
[caption id="attachment_481" align="alignright" width="225" caption="pressing out the oxygen"]
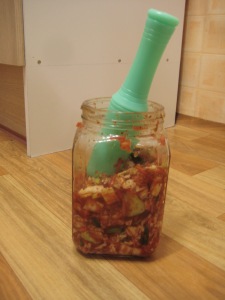 [/caption]
And now you can start pressing out the oxygen.
You want to get as much oxygen out as possible because it can have all kinds of weird stuff in it and weird stuff can cause the BAD happies (happies = bacteria) to grow and that will just end badly.
If you jar is clear like mine, you'll be able to see the bubbles coming up to the surface.
Don't be afraid of smooshing your vegetables. They're resilient. Plus, Kimchi is supposed to be wet and kind of mashy.
That being said, don't KILL them either.
I used the pestle from my mortar pestle to do it. It worked real well.
Once you are satisfied that most of the air is out, you bring your whole cabbage leaves back into the picture.
Part of the successful fermentation process is to keep your ferments under the liquid they're in. This can be real tricky when it comes to things like green beans. While this isn't always an issue, it's my first time fermenting vegetables, so I am feeling cautious.
Break your whole leaves up to fit in the jar and press them down on top of the rest of your vegetables. This will keep them covered, away from the outside air, and, hopefully, keep them under the little bit of liquid.
Now.. as far as what sort of jar you should use. Koreans often use the traditional Kimchi jar, a big clay pot of a thing. Dark brown, with a lid. The kind of thing they still keep outside, and the thing those in the country still bury in their backyard in winter. I, however, am using the more modern Kimchi jar, found at LotteMart. It's got an airlock thing on it so that the gases made by the fermentation process can escape.
If you don't have a Kimchi jar (and chances are you don't..), you should be careful not to screw your lid on too tight. This will allow the gases to escape without exploding your jar.
Now, put your jar in a nice, room temperature place and leave it for three days.
Do not be afraid.
That is what everybody says.
In the West, we have this fear of things going unrefrigerated for any length of time. "Keep hot things hot and cold things cold", etc... but people have been doing this for a long time, so it is SUPPOSED to work.
That means if you can't make it work, you are obviously less of a person.
Or.. it means... you used too much salt. Like me. Or something. else.
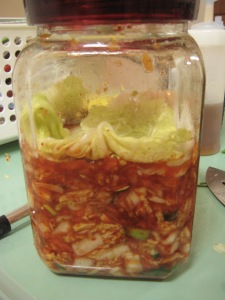
[caption id="attachment_482" align="alignleft" width="225" caption="my waiting kimchi"]
 [/caption]
Here is my finished jar.
I hope it's good, but I have low expectations...
Today I killed my SECOND batch of yogurt in a row. Actually, my third, if you count the last funky batch that we ended up throwing half of out.
This is not because yogurt is scary, though, mind you.. it is because A.) I used bad milk once and, B.) I forgot about my yogurt. Twice.
Yogurt is still easy, you just.. have to watch it. And not use bad milk.
Anyway, I am also hip deep in sourdough starter lately, too! It's pretty exciting because it's all bubbly and sour-smelling and I get to feed it every day.
Though, I just realized it's right next to my Kimchi and there's a school of thought that says ferments can cross breed and get all wacky, so I'm going to go move it now.
It's probably fine, but still.
Tonight, for dinner, we are having Kung Pao Chicken (we have a favorite place here that makes it, but it's far away, probably made with scary ingredients, and.. cheaper to make at home) and fried rice.
Because we've started soaking our grains, I've started meal planning. At first, I thought it was totally dorky, but the more I do it, the more it is AWESOME.
1. I actually end up making food 5 nights a week because I don't have to worry about what to make, I just look at my list.
2. I only have to go grocery shopping once a week.
3. I use up everything perishable we have because I can plan around the foods that will be going bad soon.
4. Soaking our grains isn't as daunting because I know when to start them.
5. It keeps me on a waaay better (and cheaper) budget than before. We're now spending about 4,000W a day on food, where before it was 10,000-11,000W. That means we're eating dinner for, like, 2,000W per person, per night. Plus leftovers for Ben's lunches. That is kind of awesome.
Anyway, my starter needs moving and I need to wash the dishes.
So long!
- catie
I love reading about your adventures in food. It's a lot like my granola-mama days only with different foods. You are my child except I would never eat kimchi... Love you!
ReplyDeletethat kimchi was super cool. Catie, a refund check from a doctor came in the mail for you today. do you want me to deposit it somewhere for you or send it some where?
ReplyDelete